Showing posts with label How-to. Show all posts

Tuesday, November 18, 2014

Mosaic Potholder/Washcloth Pattern

This geometric potholder (or washcloth) has concentric half-squares on one side and stripes on the other.  Make quick gifts while trying out a new crochet technique!

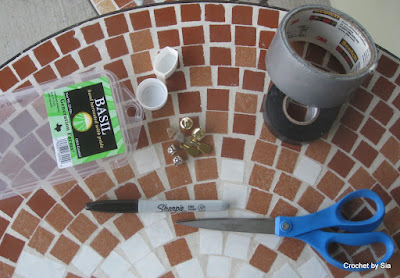
I designed this simple, free pattern to better show people the concepts of what I call mosaic crochet before they decide to purchase one of my patterns featuring this technique (click here to see them all).  I also include detailed videos to demonstrate the pattern techniques.  Each video is linked in its location in the pattern, but you can also see the entire playlist here.  Try out the pattern, and let me know what you think!


Gauge & Size
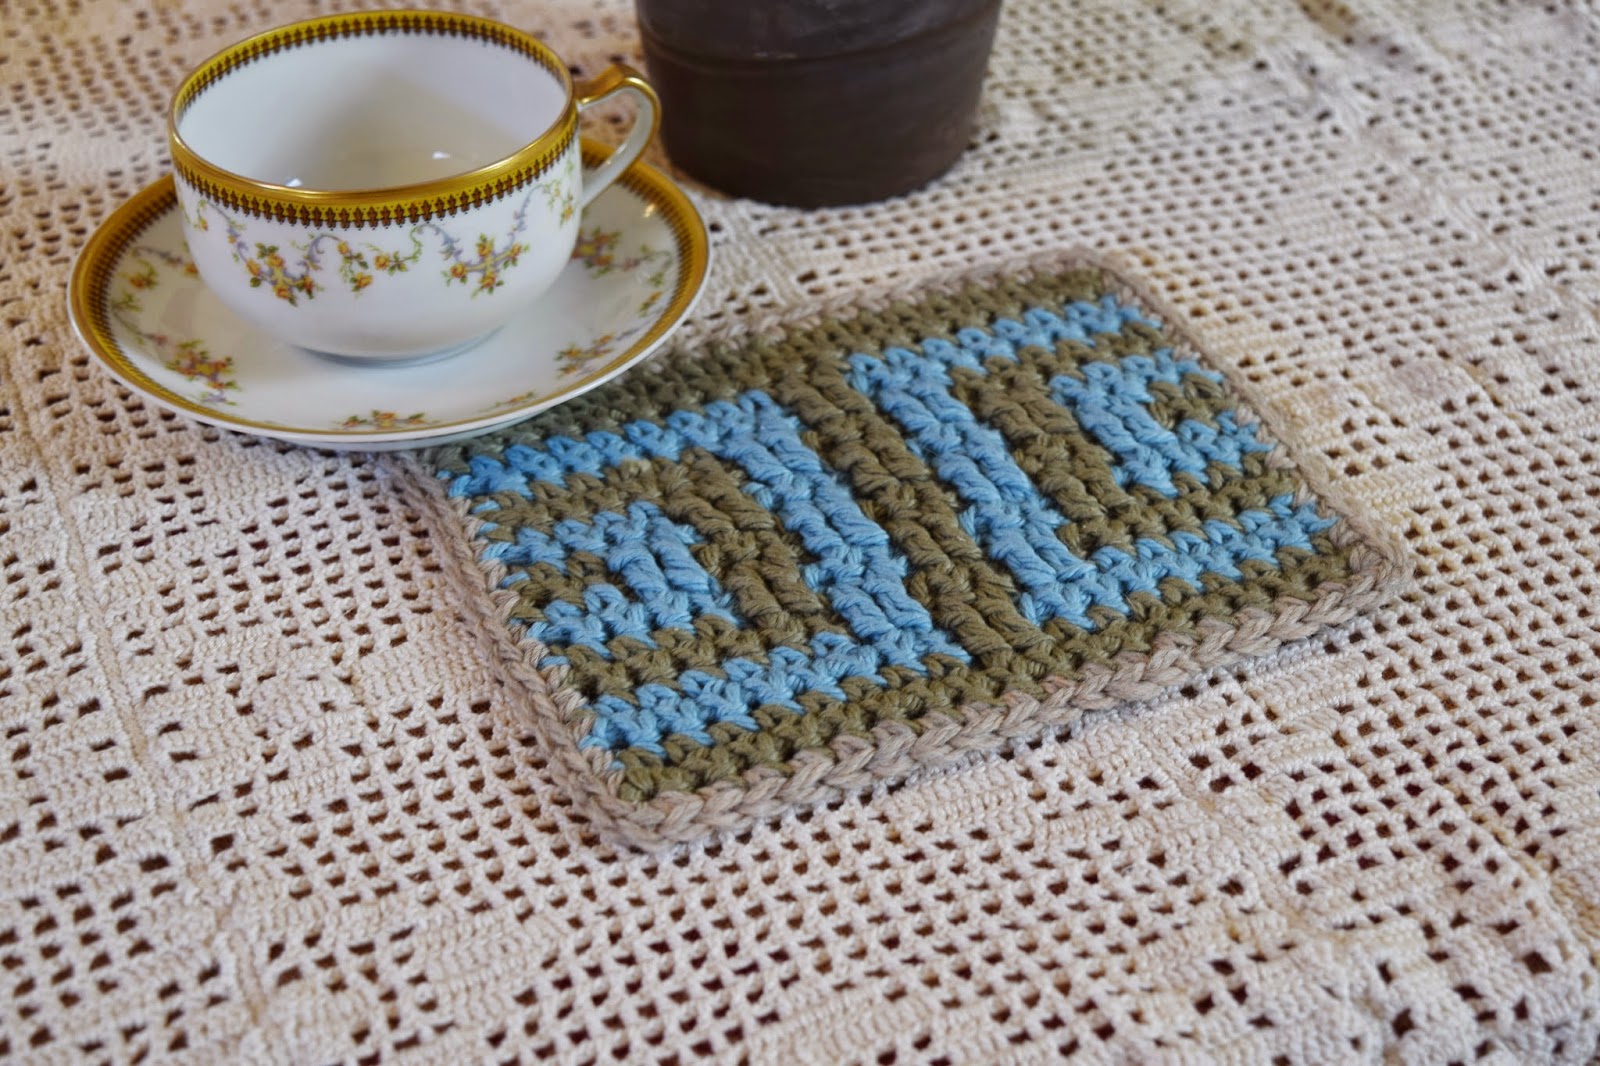
Gauge is not critical in this pattern unless you want to make it a specific size.  If you're using scrap yarn, I suggest using an appropriate hook size for your yarn thickness and allowing the potholder/washcloth to grow or shrink accordingly.  Gauge is 12 stitches and 15-16 rows of sc = 4 inches square.  The finished size is about 6 3/4 inches wide by about 5 1/2 inches long.

Design Notes
Color work:  When changing yarn colors, loop in the new color as the last “pull through” of the previous stitch to create better color borders.  Do not cut each color until the end.  Every other row, we drop a color behind the work and pick up the new color from the previous rows.

Blocking:  Blocking (according to your yarn type) is strongly encouraged as it makes for a much more professional-looking piece.

Even Rows:  All of the even-numbered rows are return rows for a particular color, and can be simplified to this:  ch 1 before first stitch, ch 3 across any ch-3 space, and sc in every sc or ht.  The detailed instructions are still included as a double-check.


Abbreviations and Special Stitches
The stitches in this pattern are fairly basic, except for the special half treble crochet (ht).  The ht is how we make the vertical stripes in the pattern.  We perform this stitch into stitches from previous rows.  

As you make the pattern, you will chain stitch across areas where you are in the wrong color for two rows. Then, on the next row when you are in the “right” color, you work your ht into the stitches 3 rows below the current row (always working in front of the chains).  The net effect is that the potholder will be the concentric half-squares on the front side and stripes on the back side. 
Why “half-treble”?  I’ve never heard of that stitch.  When I first started working mosaic crochet, I used dc as other patterns suggested.  I’ve found that those stitches are too short and thus cause curling.  Triple/treble crochet is a bit too high, and half-treble was just right.  Feel free to experiment with stitch height.

I created a video for how to make the Special Half-Treble Crochet (ht) stitch, which you can watch here:  https://www.youtube.com/watch?v=Q9oNoywwc1U.

Abbreviation = Stitch
ch = chain
ht = Special half-treble crochet (see video) – work in front of ch-3’s into the stitch 3 rows below.  Yo twice, insert hook in stitch, yo and pull through, yo and pull through 2 loops, yo and pull through remaining 3 loops
sc = single crochet
sl st = slip stitch
st = stitch
yo = yarn over

Motif Graphic
This graphic is provided for those of you who work better with pictures than text, like me.  Any square that is blank is simply a sc stitch. The ht stitches are worked into the sc’s 3 rows below the current row, and always worked in front of the chains of the in-between rows (watch the video).  Row 1 starts at the bottom with Color A, which is grey in this graphic.

Pattern
Beginning Chain:  Ch 19 with the I hook. 
Row 1:  Using the H hook, sc in second ch from hook and across (18 sc).  Ch 1, turn.

Row 2:  Sc across.  In last st, join Color B in last pull-through.  Drop Color A, but do not cut as we will pick it up on future rows (here and throughout pattern).   Ch 1, turn.

Row 3 (watch video):  In Color B, sc 8, ch 3 and skip 2 st, sc 8.  Ch 1, turn.

Row 4 (watch video):  Sc 8, ch 3 and skip 2 st, sc 8, changing to Color A in last pull-through (just pick it up from the lower rows, and make sure not to pull too tight).  Ch 1, turn.

Row 5 (watch video for rows 5 and 6):  In Color A, sc 6, ch 3 and skip 2 st, ht 2, ch 3 and skip 2 st, sc 6.  Ch 1, turn.

Row 6:  Sc 6, ch 3 and skip 2 st, sc 2, ch 3 and skip 2 st, sc 6, picking up Color B in last st.  Ch 1, turn.

Note:  Now that you have the hang of it, when you see “ch 3”, you will know to either skip 2 st or skip a previous ch 3.  It won’t be written fully out, which should make it simpler for you to read the pattern also.

Row 7 (watch video for rows 7 and 8):  In Color B, sc 4, ch 3, ht 2, ch 3, ht 2, ch 3, sc 4.  Ch 1, turn.

Row 8:  Sc 4, ch 3, sc 2, ch 3, sc 2, ch 3, sc 4, picking up Color A in last st.  Ch 1, turn.

Row 9 (watch video for rows 9 and 10):  In Color A, sc 2, ch 3, ht 2, ch 3, ht 2, ch 3, ht 2, ch 3, sc 2.  Ch 1, turn.

Row 10:  Sc 2, ch 3, sc 2, ch 3, sc 2, ch 3, sc 2, ch 3, sc 2, picking up Color B in last st.  Ch 1, turn.

Row 11 (watch video for rows 11 and 12):  In Color B, sc 2, ht 2, ch 3, ht 2, ch 3, ht 2, ch 3, ht 2, sc 2.  Ch 1, turn.

Row 12:  Sc 4, ch 3, sc 2, ch 3, sc 2, ch 3, sc 4, picking up Color A in last st.  Ch 1, turn.

Row 13 (watch video for rows 13 and 14):  In Color A, sc 4, ht 2, ch 3, ht 2, ch 3, ht 2, sc 4.  Ch 1, turn.

Row 14:  Sc 6, ch 3, sc 2, ch 3, sc 6, picking up Color B in last st.  Ch 1, turn.

Row 15 (watch video):  In Color B, sc 6, ht 2, ch 3, ht 2, sc 6.  Ch 1, turn.

Row 16:  Sc 8, ch 3, sc 8, picking up Color A in last st.  Fasten off Color B.  Ch 1, turn.

Row 17:  In Color A, sc 8, ht 2, sc 8.  Ch 1, turn.

Row 18:  Sc across.  Fasten off.  Weave in all ends.

If desired, add a border of sc around the entire work (watch video).  For the sides, use about one sc per row.  I ended up using 3-4 sc per 4 rows as one per every row stretched out the sides too much.  Sc 3 in each corner.

Wednesday, November 20, 2013

Vieux Carré Towel

New pattern released on Etsy and Ravelry!

The Vieux Carré, or Old Square, is the original French name of the French Quarter in New Orleans. This towel was inspired by intricate old world details and luxury. The outer edging mimics picot stitches and fleur de lis. Set out a few of these in your guest bathroom when entertaining, or use pair it with bath products in a sumptuous gift basket.

This crochet pattern is written for the fingertip towel size, and instructions are included for how to modify for hand or bath towel size. Includes 3 photo tutorials for special stitches. Appropriate for a beginner who is confident in basic stitches and wants to try some new stitch motifs.


**NEW** You can now get patterns for this towel, the Spa washcloth and bath mitt, AND the Luxe washcloth and bath mitt in one discounted pattern pack.  Check it out here.


Wednesday, November 13, 2013

Team Colors Earflap Hat Pattern Release & Embroidery Tips

Represent your school!!  I just released the Team Colors Earflap hat on Etsy and Ravelry.

It uses half-double crochet and single crochet for an easy work-up.  Note that this pattern is for the base hat, NOT for the embroidery representing any particular team.  So, this blog post describes how I added my team embroidery so that you can get ideas on how you can customize your hat.


First, I found an image that I wanted to use and printed it out.  I reduced the size by making a copy and reducing it by using the copier setting (old school style).  Next, I used a thin, translucent paper to trace the image.  Actually, I used parchment paper, like the kind for cooking since I don't have fancy tracing paper or that special temporary fabric used for embroidery.

Let me take a time out to note that embroidering on crochet is an imperfect art.  The spaces between stitches can distort stitches.  I found that making a good image worked better by only embroidering the outline rather than filling it in.  For the embroidery masters out there, please chime in with tips.  My guess is sewing some fabric to the back of the forehead flap may make an improved embroidery "canvas".

Back to the instructions...  I cut out my traced image (keeping some border space) and placed it on top of the forehead flap where I wanted the final image to go and temporarily pinned it there.  Next, I used back stitch to embroider the outline of my design.

Finally, I carefully removed the tracing (parchment in my case) paper in small bits to ensure that I didn't distort any of the stitches.  I tested filling in the outline at this point but was not successful in producing something that I liked, so I kept it as an outline.  

I'd love to see your own results or hear your tips!

Wednesday, December 29, 2010

Fun with crazy yarn

Thanks to after-Christmas sales coinciding with my birthday (and thus justification to buy something "just because", I finally was brave enough to acquire some Pagewood Farms U-Knitted Nations Handspun Bouquet.  It's super super bulky but the thickness varies drastically every 8 inches or so.  Also, it has what I like to call fun little pieces of "flair" every few feet - bits of yarn that look like little leaves or stems.  I got extra brave and bought the bright variegated color scheme.  After a bit of crochet fiddling, this is the cowl I ended up with:


(Sorry, I wasn't made up enough today to actually wear it in the photo).

I'm not sure when I will be brave enough to wear it - probably on a day when I am in great need of a sunny disposition and a smile. 

If you're a fellow crocheter who thought you couldn't really use this yarn, here is how I made the cowl work with just 1 skein and an S hook (19mm):

  1. Ch 28, join with a sl st to beginning ch.
  2. Ch 1, sc in same st, ch 1, *sc in next st, ch 1, repeat from * around, joining with a sl st to top of beg sc.
  3. Repeat row 2 until desired height.
You have to manipulate the flowers a little so that they face the front, and you occasionally have to pull them through a loop but the hook and loops are so large that this isn't usually a problem.  You can budge the flowers a little bit in each direction if you need to optimize their location.  The stitches are a little difficult to recognize sometimes so this may be easier for a more experienced crocheter.

If you need to frog it, gently take it apart by manipulating with your fingers so it falls apart easily (no tugging!).  I think you may be able to get even more height by only working into the front or back loop, but I didn't like the way it looked on mine.  Let me know if you found a way to crochet this yarn too!

Sunday, December 19, 2010

Homemade Recycled Rattles

I'm making a few Christmas presents for little ones this year, and I've been struggling trying to find the best way to make them rattle.  A friend suggested to put bells inside old-fashioned pill boxes, but I found these too large to fit in my cute little amigurumi guys.  Thus, I invented my own and thought I would share with you how to make free or almost-free rattles.  Disclaimer:  the rattles aren't really machine washable so that could put a damper on your hopes (if you have ideas for making them more robust, please share!)

Here is my first cute little guy who I wanted to add noise to:


To start off, you need some materials and some supplies.
  • Container for rattle - I dug through the recycle bin and chose an inhaler mouth cap and a milk bottle spout cap.  Of course, these are open on one side so we need a means of closing them...
  • Top of rattle - I dug through the recycle bin again and found some thinner flat plastic in the form of a fresh basil container from the grocery store.  Perfectly cut-able and still noisy!
  • Noisy filling - Here's the part that can or cannot be free.  Experiment with multiple objects.  I picked up some small pebbles from outside and dug through the toolbox for small metal things (like shelf pegs or nuts).  It's, ahem, preferable not to use sharp objects which the little ones might find upon aging a few years and deciding to perform their first dissection upon said amigurumi.  I also already had some small bells.
  • Sticky stuff - I picked electrical tape, but my guess is duct tape would work pretty good too (I was afraid of gummy stuff getting everywhere though).
  • Cutting device (a.k.a., scissors)
  • Sharpie


First, use the containers as a stencil for the lid material.  Draw an outline on the flat plastic, then cut out (note that Sharpie ink may smear - like mine):


Next, experiment with noisy fillings by putting into container and placing lid on top.  Hold it together with your fingers (obvious I know, but just in case you couldn't figure that part out) and shake to see which fillings you like best.  I ended up with one small bell and one pebble in each:


Finally, assemble together with your chosen sticky stuff.  I criss-crossed the electrical tape and ran it all the way around:


One final piece of advice I have for you is to make sure you put it in your amigurumi before the hole is too small to fit it though - another piece of obvious advice but let's just say a person-not-to-be-named forgot this important detail and had to undo the last row to fit the rattle in.

Sunday, December 12, 2010

Picot Tutorial

Since several of my patterns use picot stitches, I thought I would post my method for making picot stitches, which you can use for all of my patterns (some use different top chain lengths though).

Step 1:  The first step is to make a sc in the stitch indicated.
Step 2:  Next, ch 3 (photo shows a ch-4 but most patterns use only a ch-3). 
Step 3:  Attach to the sc just made by inserting hook in both the front loop and the left post of the sc.  See dotted lines in Step 2 photo as well as below.

Step 4:  Complete the sl st by yarning over and pulling a loop through all three loops on hook.
Post-picot:  Continue with next stitch indicated in pattern.


Happy Picoting!

Wednesday, November 10, 2010

For the love of Japanese crochet

I heart Japanese crochet. They have some of the cutest and ingenious patterns that I have ever seen. Every time I am in San Francisco, I go to the Kinokuniya bookstore in Japantown. I have to keep myself under control otherwise I end up buying more than I can carry or afford. Here is a small selection of my books – unfortunately the rest are in storage while I continue my gypsy lifestyle:
IMG_5737
I have only completed a few projects because of my “other job”, but here’s a glimpse of them:
IMG_5731IMG_1761IMG_1815IMG_1795IMG_2061IMG_5699
   
The rest of this post will be somewhat of a how-to-begin-attacking-Japanese-crochet-patterns. They have such a wealth of great patterns I want to share with you so please ask questions if you need help with figuring out whatever is not covered here!

General Help

If this is your first time looking at crochet charts, study the Craft Yarn Council (a.k.a., yarnstandards.com) international stitch guide here. The great news is that Japanese crochet uses these same standards! More and more books in English are incorporating charts so you can start with a chart from an English book if the Japanese is still too intimidating (but I say go for it now!).

Look at patterns with an open mind and ignore the Japanese symbols at first. You can figure out 80-90% of the pattern just by studying the photo and the chart. Typically, the first part of the book has the glossy photos with numbers next to the item. Use this number to find the pattern in the back of the book. Most books also have a stitch guide in the very back as well showing each symbol (or at least the complex ones) and illustrated pictures of how to do them so you still don’t need to know Japanese to figure them out. Purlyshells wrote a great post here showing how she attacked her first Japanese crochet pattern in a step-by-step manner.

If you’re the type who frets about the details like yarn type, gauge, etc. (or you are attempting a complex pattern like for a garment), there are several resources on the internet which list out key Japanese characters (keep in mind there are 3 alphabets in Japanese) and their English translation. I have listed a few below. You can always use Google Translate if you are really determined (or if you’re trying to read a Japanese website).
  • If you’re on Ravelry, join the Japanese Knitting and Crochet group.
  • Snuffykin's post is a great resource for helping you use the right hook size and matching up with yarn weights (in English!)
  • Japanese terms translated to English here and here (mostly knit terms but still very useful)
  • Amigurumi help at WeLoveAmigurumi
  • More Amigurumi help in a pdf
P.S. If you’re making crochet flowers, many Japanese patterns use an adjustable or "magic" ring (rather than a chained loop) which works great at tightening the center once your done – Crochetme's tutorial in English is great at showing how to use an adjustable ring.  Another common flower stitch is a bullion; HealMyHands has a great step-by-step tutorial here.

How to Find Books and Patterns

You can buy Japanese crochet books online through YesAsia.com and the Kinokuniya bookstore website (then click on your region like “BookWeb USA”). Plenty of other sites exist, but these are my favorite and both are reliable. The best way to find books you like is still to go to Kinokuniya in San Francisco and just flip through the books in the knit/crochet section. Your local independent yarn shop may have a small selection for sale or as reference so you can get an idea of what they are like.

Pierrot Yarns' website (a Japanese yarn company), has many free patterns but you have to navigate around a lot (use Google translate or just click on photo links). Here’s how I got to one pattern:

  • Find a photo that looks like crochet, and click on it.  
  • You might have to scroll down to find that photo again and keep clicking until when you scroll down you get something like this with what looks like the intro to a pattern (yarn type, needles, etc.).
  • The last thumbnail after the button thumbnail looks like a mini pattern: amizu
  • Click on the link to the right and that’s how you get the pdf (which you can also find here for the example shown)
I just found out from a fellow Raveler that Pierrot has an English language pattern club with a handy link to Japanese crochet patterns, symbols, and videos!  You have to sign up, but it's free:  http://gosyo.shop.multilingualcart.com/free1.php.


Good luck and happy hooking! Let me know if you have questions!
Related Posts Plugin for WordPress, Blogger...