Showing posts with label Amigurumi. Show all posts

Thursday, December 30, 2010

Finally, I can share my crafty Christmas presents!

I was itching to share all my crochet fun in December but since a few of my "loved ones" read this blog, I couldn't risk them peaking at their presents.  I had so much fun this year because gifting gives me a chance to try out new or different patterns that I wouldn't normally try for myself but are perfect for friends and family, and I so love giving handmade gifts.  More good kharma!

First, I had fun with a few little amigurumi guys for the new baby nephews in the family - they became besties while hanging out under the Christmas tree and were a little sad to be split apart:


Next, I made several sets of washcloths and bathmitts to pair with some great Body Shop products (thank you, Groupon!).  These were perfect since they're a quick "hook", and they were fun since I designed them as I went (you can find the first pattern here and the second here)


Since I have to pay homage to my beloved Japanese crochet and I wanted a really fun gift for my mom who is a fellow crocheter, I made a flower tape measure cozy - both my mom and grandmom got a kick out of it!


For the padre, I was really excited to try out the Aztec scarf to learn this new technique where each side has a different pattern even though you're only crocheting one layer - it really got the creative juices flowing so I'm hoping I can come up with some really unique designs in the future.


For the boyfriend's cold feet, I decided to stitch up Doris Chan's slippers - the gauge was tricky but I'm happy to report that they fit perfectly!


This crocheted Julie cuff was a great pattern find - I hope to make more in several other fun colors in the future.


And finally, the masterpiece weightless wrap for my grandmother in Tunisian crochet with an alpaca "mohair" yarn.  It took a bit of time but was worth the effort.  Now if only she would actually wear it instead of saving it for "special occasions".  :)

Sunday, December 19, 2010

Homemade Recycled Rattles

I'm making a few Christmas presents for little ones this year, and I've been struggling trying to find the best way to make them rattle.  A friend suggested to put bells inside old-fashioned pill boxes, but I found these too large to fit in my cute little amigurumi guys.  Thus, I invented my own and thought I would share with you how to make free or almost-free rattles.  Disclaimer:  the rattles aren't really machine washable so that could put a damper on your hopes (if you have ideas for making them more robust, please share!)

Here is my first cute little guy who I wanted to add noise to:


To start off, you need some materials and some supplies.
  • Container for rattle - I dug through the recycle bin and chose an inhaler mouth cap and a milk bottle spout cap.  Of course, these are open on one side so we need a means of closing them...
  • Top of rattle - I dug through the recycle bin again and found some thinner flat plastic in the form of a fresh basil container from the grocery store.  Perfectly cut-able and still noisy!
  • Noisy filling - Here's the part that can or cannot be free.  Experiment with multiple objects.  I picked up some small pebbles from outside and dug through the toolbox for small metal things (like shelf pegs or nuts).  It's, ahem, preferable not to use sharp objects which the little ones might find upon aging a few years and deciding to perform their first dissection upon said amigurumi.  I also already had some small bells.
  • Sticky stuff - I picked electrical tape, but my guess is duct tape would work pretty good too (I was afraid of gummy stuff getting everywhere though).
  • Cutting device (a.k.a., scissors)
  • Sharpie


First, use the containers as a stencil for the lid material.  Draw an outline on the flat plastic, then cut out (note that Sharpie ink may smear - like mine):


Next, experiment with noisy fillings by putting into container and placing lid on top.  Hold it together with your fingers (obvious I know, but just in case you couldn't figure that part out) and shake to see which fillings you like best.  I ended up with one small bell and one pebble in each:


Finally, assemble together with your chosen sticky stuff.  I criss-crossed the electrical tape and ran it all the way around:


One final piece of advice I have for you is to make sure you put it in your amigurumi before the hole is too small to fit it though - another piece of obvious advice but let's just say a person-not-to-be-named forgot this important detail and had to undo the last row to fit the rattle in.

Wednesday, November 10, 2010

For the love of Japanese crochet

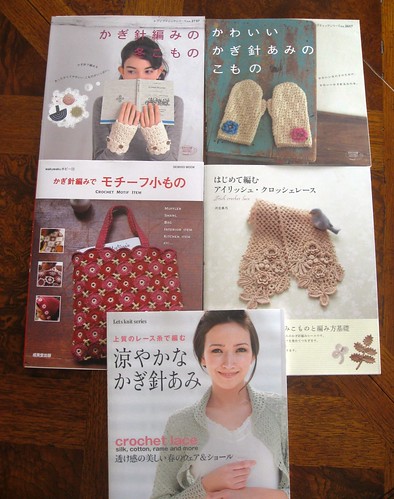
I heart Japanese crochet. They have some of the cutest and ingenious patterns that I have ever seen. Every time I am in San Francisco, I go to the Kinokuniya bookstore in Japantown. I have to keep myself under control otherwise I end up buying more than I can carry or afford. Here is a small selection of my books – unfortunately the rest are in storage while I continue my gypsy lifestyle:
IMG_5737
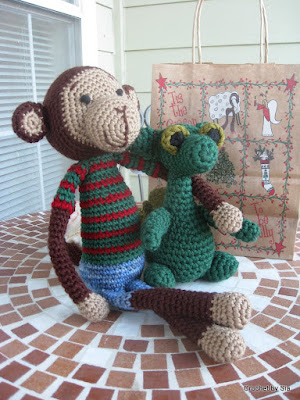
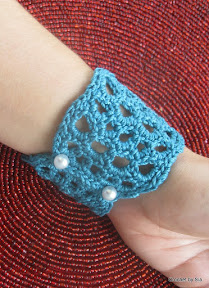
I have only completed a few projects because of my “other job”, but here’s a glimpse of them:
IMG_5731IMG_1761IMG_1815IMG_1795IMG_2061IMG_5699
   
The rest of this post will be somewhat of a how-to-begin-attacking-Japanese-crochet-patterns. They have such a wealth of great patterns I want to share with you so please ask questions if you need help with figuring out whatever is not covered here!

General Help

If this is your first time looking at crochet charts, study the Craft Yarn Council (a.k.a., yarnstandards.com) international stitch guide here. The great news is that Japanese crochet uses these same standards! More and more books in English are incorporating charts so you can start with a chart from an English book if the Japanese is still too intimidating (but I say go for it now!).

Look at patterns with an open mind and ignore the Japanese symbols at first. You can figure out 80-90% of the pattern just by studying the photo and the chart. Typically, the first part of the book has the glossy photos with numbers next to the item. Use this number to find the pattern in the back of the book. Most books also have a stitch guide in the very back as well showing each symbol (or at least the complex ones) and illustrated pictures of how to do them so you still don’t need to know Japanese to figure them out. Purlyshells wrote a great post here showing how she attacked her first Japanese crochet pattern in a step-by-step manner.

If you’re the type who frets about the details like yarn type, gauge, etc. (or you are attempting a complex pattern like for a garment), there are several resources on the internet which list out key Japanese characters (keep in mind there are 3 alphabets in Japanese) and their English translation. I have listed a few below. You can always use Google Translate if you are really determined (or if you’re trying to read a Japanese website).
  • If you’re on Ravelry, join the Japanese Knitting and Crochet group.
  • Snuffykin's post is a great resource for helping you use the right hook size and matching up with yarn weights (in English!)
  • Japanese terms translated to English here and here (mostly knit terms but still very useful)
  • Amigurumi help at WeLoveAmigurumi
  • More Amigurumi help in a pdf
P.S. If you’re making crochet flowers, many Japanese patterns use an adjustable or "magic" ring (rather than a chained loop) which works great at tightening the center once your done – Crochetme's tutorial in English is great at showing how to use an adjustable ring.  Another common flower stitch is a bullion; HealMyHands has a great step-by-step tutorial here.

How to Find Books and Patterns

You can buy Japanese crochet books online through YesAsia.com and the Kinokuniya bookstore website (then click on your region like “BookWeb USA”). Plenty of other sites exist, but these are my favorite and both are reliable. The best way to find books you like is still to go to Kinokuniya in San Francisco and just flip through the books in the knit/crochet section. Your local independent yarn shop may have a small selection for sale or as reference so you can get an idea of what they are like.

Pierrot Yarns' website (a Japanese yarn company), has many free patterns but you have to navigate around a lot (use Google translate or just click on photo links). Here’s how I got to one pattern:

  • Find a photo that looks like crochet, and click on it.  
  • You might have to scroll down to find that photo again and keep clicking until when you scroll down you get something like this with what looks like the intro to a pattern (yarn type, needles, etc.).
  • The last thumbnail after the button thumbnail looks like a mini pattern: amizu
  • Click on the link to the right and that’s how you get the pdf (which you can also find here for the example shown)
I just found out from a fellow Raveler that Pierrot has an English language pattern club with a handy link to Japanese crochet patterns, symbols, and videos!  You have to sign up, but it's free:  http://gosyo.shop.multilingualcart.com/free1.php.


Good luck and happy hooking! Let me know if you have questions!
Related Posts Plugin for WordPress, Blogger...