Showing posts with label Homemade. Show all posts

Sunday, November 9, 2014

Square Key Scarf Pattern Release!

Another pattern release!  I'm on a roll now.  :)  Check out the photos for my newest design, the square key unisex scarf.  Unique Greek key motif on one side and stripes with texture on the other.  And one super-cute canine model.

Pattern can be found on both Etsy and Ravelry.  Cheers!


Wednesday, November 5, 2014

L.Y.L.A.S. Cowls Pattern Just Released!!

Love You Like A Sister...

The photos are finally in, so you can now check out my new L.Y.L.A.S. pattern!  Grab a crochet friend for this fun project (or just make two if you don't have a best crochet friend).  :)

You can find the pattern in my Etsy shop and also on Ravelry.  Enjoy!


Thursday, November 21, 2013

The Fifth and Sixth Hats of Christmas

(click here for the intro post on my Twelve Hats of Christmas)

For the Fifth Hat of Christmas I truly crocheted for me... more than 5 colorful rings...
I finally found a good use for my Noro Silk Garden - it's been sitting in my stash for over 3 years!  

Ravelry project notes:  I modified the beginning chain to only 78 stitches. I also modified the last few rows (top of hat) to make it more oblong rather than circular (crocheted together in front and back area more than sides).

For the Sixth Hat of Christmas I truly crocheted for me... one hat a laying...
I say "a laying" because this hat is a bit floppy so it takes some work to get the bill to sit properly.  I tried felting a bit, but got tired before it did much.  

Ravelry project notes:  This is a really cute pattern. The smaller stitches made it take a bit longer, but it’s an easy pattern - basically just a bunch of double crochet and some single crochet.
This yarn is theoretically DK, but actually probably a bit thinner. It lays and drapes well, which I’m not sure is good for a hat pattern, but I like how it’s low-profile.
I added one more row of double crochet, but I don’t think it was necessary in hindsight.
I needed to block this a lot as it curls - I think more for the yarn and looser stitch. I need to re-block the brim a bit.
FYI, yarn amounts are only approximate. My battery died on my scale. I used 2 strands for the flower.
My Hat Queue Status
* subject to change based on my whim

  1. Women's Peaked Cap - done!
  2. Felted Fedora from The Color Book of Felted Crochet - done!
  3. Crochet Owl Hat for a toddler... or maybe an adult like me because it's so cute - adult done!
  4. Puppy Hat for 6-9 month old - done!
  5. Cap with flower (pdf) - done!
  6. Slanting Stitches hat (photo is bad, but it looks cute when you roll up the brim) - done!
  7. Audrey's Lace Cap
  8. Lacey Newsboy Cap (I have no idea the real name - this is a Japanese pattern from this book)
  9. Puff Stitch Newsboy (ditto on the name - from this other Japanese crochet book)
  10. Relax Ramie Hat (pdf)
  11. Tsubaki Cotton Hat (pdf)
  12. Girly-style hat (pdf)

Maybes
Please post links to any crocheted hats you think I should make in the comments!

Thursday, November 7, 2013

The Third and Fourth Hats of Christmas

For the Third Hat of Christmas I truly crocheted for me... a hat for the play pen...

This was actually my second hat from this designer - I learned that I needed to tighten my gauge a bit when I accidentally made an owl hat that fit myself instead of my friend's toddler.  As they say, we learn from our mistakes.  Here is the Puppy Hat with some bonus photos of the Puppy Hat on a Puppy.


Ravelry Project Notes:  I had to go down one hook size to get approximate gauge. I also consciously tightened up a bit. I made an extra round on the nose, and also stuffed it with yarn scraps before sewing it on. Cute hat.

For the Fourth Hat of Christmas I truly crocheted for me... one big bird...

Alas, the aforementioned giant owl hat theoretically for a toddler.  I may have found my new Mardi Gras hat.  :)  Oopsie...


Ravelry Project Notes:  So, my gauge was off, but I was too lazy to pay attention until it was too late. Poor me. Stuck with a really cute owl hat that was supposed to be for a child that now happens to fit me. :)
I fixed my gauge in the same designer’s puppy pattern by going down to a G hook and purposely crocheting with a bit more tension. I love her designs.
My Hat Queue Status
* subject to change based on my whim

  1. Women's Peaked Cap - done!
  2. Felted Fedora from The Color Book of Felted Crochet - done!
  3. Crochet Owl Hat for a toddler... or maybe an adult like me because it's so cute - adult done!
  4. Puppy Hat for 6-9 month old - done!
  5. Cap with flower (pdf)
  6. Audrey's Lace Cap
  7. Lacey Newsboy Cap (I have no idea the real name - this is a Japanese pattern from this book)
  8. Puff Stitch Newsboy (ditto on the name - from this other Japanese crochet book)
  9. Slanting Stitches hat (photo is bad, but it looks cute when you roll up the brim)
  10. Relax Ramie Hat (pdf)
  11. Tsubaki Cotton Hat (pdf)
  12. Girly-style hat (pdf)

Maybes
Please post links to any crocheted hats you think I should make in the comments!

Friday, November 1, 2013

The First and Second Hats of Christmas

For the First Hat of Christmas I truly crocheted for me... a quick and easy project under an oak tree...

The results are in, and I'm 1 for 2.  The peaked hat came out cute, and it was quick and easy:


Ravelry Project notes:  Cute and quick hat. I had no problem with sizing. My natural tension fit the size of my head. I did have to redo the brim though. I assumed I would need to tighten up a bit, but that was clearly the wrong assumption as it made the brim curl and stick to my forehead rather than stick out like a real brim. Instead, I loosened up a bit more than natural and it came out fine. Love it!

For the Second Hat of Christmas I truly crocheted for me... a felted fedora that I really do not love...

Yeah, so this originally came out more like a top hat until I manipulated it into a salvageable cowboy hat.  I was a little freaked out before the felting, but it shrank up fine after about an hour of agitation... talk about a workout!  I don't like the hat so much, but it was fun exploring felting, and I'm sure this won't be my last felting project.


Ravelry Project Notes:  So, this was supposed to be a felted fedora. It originally came out more like a top hat, but I was able to manipulate the crown a bit to make it shorter and look more like a cowboy hat. It’s all different colors because I kept running out of yarn. So, it wasn’t the greatest project, but I do like how felting comes out so I might try felting out a bit more. The higher difficulty is only because of the work involved in agitating for a hard felt.

My Hat Queue Status
* subject to change based on my whim
  1. Women's Peaked Cap - done!
  2. Felted Fedora from The Color Book of Felted Crochet - done!
  3. Crochet Owl Hat for a toddler... or maybe an adult like me because it's so cute
  4. Cap with flower (pdf)
  5. Audrey's Lace Cap
  6. Lacey Newsboy Cap (I have no idea the real name - this is a Japanese pattern from this book)
  7. Puff Stitch Newsboy (ditto on the name - from this other Japanese crochet book)
  8. Slanting Stitches hat (photo is bad, but it looks cute when you roll up the brim)
  9. Relax Ramie Hat (pdf)
  10. Tsubaki Cotton Hat (pdf)
  11. Girly-style hat (pdf)
  12. TBD

Maybes
Please post links to any crocheted hats you think I should make in the comments!

Tuesday, October 29, 2013

The 12 Hats of Christmas

As some of you may know, I'm an avid triathlete.  Well, was an avid triathlete.  You see, I did Ironman Texas in May and haven't quite gotten the itch to be "avid" since then.  In the meantime, I need another endurance sport to pursue, so I have chosen crochet hat-making.

While this may be no true marathon, it will probably take about 26.2 hours to finish all 12 hats I intend to make in this challenge and may even come with some chaffage.  Hopefully not.  I can't imagine yarn chaffage would be good.

Without further ado, let the race begin...

My Hat Queue Status
* subject to change based on my whim, though I'm definitely open to suggestions from fans and friends
** sorry for the lack of pictures - I'm trying to follow copyright rules so I will post photos of my own projects when they are done - in the meantime, you can check out the official photos at the links below
  1. Women's Peaked Cap
  2. Felted Fedora from The Color Book of Felted Crochet
  3. Crochet Owl Hat for a toddler... or maybe an adult like me because it's so cute
  4. Campus Field Cap 
  5. Audrey's Lace Cap
  6. Lacey Newsboy Cap (I have no idea the real name - this is a Japanese pattern from this book)
  7. Puff Stitch Newsboy (ditto on the name - from this other Japanese crochet book)
  8. Slanting Stitches hat (photo is bad, but it looks cute when you roll up the brim)
  9. Princess Leia Bun Hat (Ravelry link, sorry for non-ravelers)
  10. Another TBD baby animal hat
  11. TBD
  12. TBD

Maybes
  • Fan Lace Beanie (I have no idea the real name - this is a Japanese pattern from this book)
  • Fan puff stitch and flower cloche (ditto on the name - from this other Japanese crochet book)
  • Granny squares braided beanie (Ravelry link, sorry for non-ravelers)
  • Elegant hat
Please post links to any crocheted hats you think I should make in the comments!

Wednesday, February 13, 2013

Designing Pineapple Crochet Cuffs


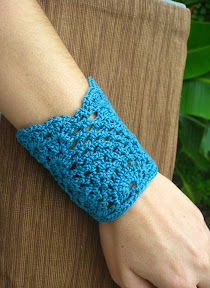
While brainstorming new crochet cuff/bracelet ideas, I thought, why not use the classic pineapple pattern?  I love crochet pineapples, but I never had a good use for them other than doilies, and, let’s face it, you can have too many doilies.  This is probably not a brilliant idea, but I thought it was pretty cool, and wanted to share with the rest of you crafters.


I’ve posted two patterns on my blog so far – the purple bracelet is Pineapple Cuff #1, and the teal one is Pineapple Cuff #2.  You can use these patterns as a start, or easily come up with your own.  Here are a few tips that I discovered in the process of making those two cuffs:
  • Patterns with more open space might be more flattering on the wrist.  For example, I prefer the purple cuff, but before I made them, I thought I would like the other one more.
  • You can either do one repeat of your pineapple pattern and add extra stitches to either side (like my purple one), or you can do 2 repeats if they are narrow enough (like the teal one). 
  • To make the work wide enough to fit your wrist, you can add stitches before and after the pineapple pattern like the purple cuff, or you can work only the pineapple pattern, then turn the work sideways and keep adding rows to each side until it is wide enough.
  • No matter which pattern you use – make sure you lightly steam the work before adding buttons to lightly block it.  These lacey patterns can get really wobbly – don’t be lazy, steam your work and it will look 100% better!

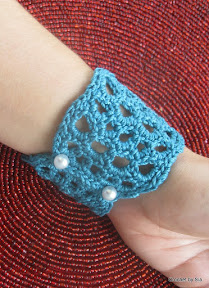
For closures, I’m a big fan of pearl buttons.  These patterns are generally long (making a wide cuff), so I would use at least 3 buttons per cuff.  If you have other ideas on closures, please share!

I would love to see where you crafty people take this idea – please share your photos and ideas.

Pineapple Wrist Cuff #2


For ideas on ways to design your own unique pineapple cuffs from your favorite pineapple patterns, see this post:  Designing Pineapple Crochet Cuffs

Want to support independent designers? Consider purchasing a printer-friendly (pdf) version of this pattern on Etsy for a nominal amount. Or, bump up to a 3-pattern pack for crochet bracelets! ðŸ’—

Note:  Don’t skip the blocking!  It’s as simple as lightly steaming the work.  It takes less than one minute, and it will fix all those wavy/wobbly issues.  I promise!


Yarn:  I used J&P Coats Royale Fashion Crochet (Size 3), less than one skein.

Materials:  Crochet hook size US C (2.5mm), small yarn needle to weave in ends and sew on buttons, buttons (3 or more).

Gauge and size:  Gauge is not critical as the size is adjusted by adding or subtracting side border rows.  Start by working the first two rows.  If the work is too small, you can continue.  If the cuff is already too large, then you will have to tighten your stitches either (smaller hook, smaller yarn).  My version after adding the border is a curved 6.5 inches at the wrist, and wider on the part further up the arm.  My wrist is about 6 inches in diameter.

Abbreviations and Special Stitches 
ch = Chain sc = Single crochet
hdc = Half double crochet
dc = Double crochet
sl st = Slip stitch
st = Stitch
fan = 2 dc, 1 ch, 2 dc all in one stitch

Pattern

Beginning chain:  Ch 38.

Row 1:  Sc in 2nd ch from hook.  *(Ch 3, skip 3, sc, skip 4, 9 dc in next stitch, skip 4, sc, ch 3, skip 3, sc), repeat from * once.  Turn.

Row 2:  Ch 3, 2 dc in top of same sc, (ch 1, dc) in top of each previous dc (9 total), ch 1, fan in center sc stitch, (ch 1, dc) in top of each previous dc (9 total), ch 1, 3 dc in last sc.  Turn.

Row 3:  Ch 3, 2 dc in top of same dc, ch 1, skip the first dc of the pineapple and *(sc in next ch-1 space, ch 3), repeat from *6 times, sc in next ch-1 space, ch 1, fan in ch-1 space of previous fan, ch 1, skip the first dc of the pineapple and *(sc in next ch-1 space, ch 3), repeat from *6 times, sc in next ch-1 space, ch 1, 3 dc in top of last dc.  Turn.

Row 4:  Ch 3, 2 dc in top of same dc, ch 1, *(sc in ch-3 space, ch 3), repeat from * 5 times, sc in last ch-3 space, ch 1, fan in ch-1 space of previous fan, ch 1, *(sc in ch-3 space, ch 3), repeat from * 5 times, sc in last ch-3 space, ch 1, 3 dc in top of last dc.  Turn.

Row 5:  Repeat Row 4 except that the number of repeats will be reduced by 1 for each pineapple.

Row 6:  Repeat Row 4 except that the number of repeats will be reduced by 2 for each pineapple.


Row 7:  Ch 3, (dc, ch 1, 2 dc) all in same first st, ch 1, *(sc in ch-3 space, ch 3), repeat from * 2 times, sc in last ch-3 space, ch 1.  In ch-1 space of previous fan, (2 dc, ch 1, 2 dc, ch 1, 2 dc).  Ch 1, *(sc in ch-3 space, ch 3), repeat from * 2 times, sc in last ch-3 space, ch 1, fan in top of last st.  Turn.

Row 8:  Ch 3, fan in ch-1 space of previous fan, ch 1, *(sc in ch-3 space, ch 3), repeat from * once, sc in last ch-3 space, ch 1, fan in ch-1 space of previous super-fan, ch 1, fan in next ch-1 space of super-fan.  Ch 1, *(sc in ch-3 space, ch 3), repeat from * once, sc in last ch-3 space, ch 1, fan in ch-1 space of previous fan, dc in last st.  Turn.

Row 9:  Ch 3, 2 dc in same st, fan in ch-1 space of previous fan, ch 1, sc in ch-3 space, ch 3, sc in ch-3 space, ch 1, fan, ch 1, fan, ch 1, fan, ch 1, sc in ch-3 space, ch 3, sc in ch-3 space, ch 1, fan, 3 dc in last st.  Turn.

Row 10:  Ch 3 (counts as 1st dc of fan), fan in first st, ch 1, fan, ch 1, sc in ch-3 space, ch 1, fan, ch 1.  All in next ch-1 space of center fan:  2 dc, ch 1, 2 dc, ch 1, 2 dc.  Ch 1, sc in ch-3 space, ch 1, fan, ch 1, fan in last st.  Turn.

Row 11:  Ch 1, sc in first st, *(ch 3, sc in next ch-1 space) all the way across.  Sc two more times in last st to create a corner and start the border on the sides and bottom.  Do not turn.

Border
Side 1:  Rotate the work 90 degrees so that you can now continue crocheting sc evenly along this side edge.  When you get to the end, ch 1, turn, and crochet the next row.  The side might be uneven so use various stitches (sl st, sc, hdc, dc) to even out the height (i.e., in valleys use taller stitches and on hills use shorter stitches).  When you get to the end, turn, 2 sc, make a button hole (ch and skip stitches according to the size of your button), sc to middle, make a button hole, sc to almost the end, make another button hole, sc to end.  Add 2-3 more sc in last stitch to create a corner.  Do not turn.

Bottom:  Rotate the work 90 degrees so you can now continue crocheting sc evenly along this bottom edge.  Add 2-3 more sc in last stitch to create a corner.  Do not turn.

Side 2:  Rotate the work 90 degrees so that you can now continue crocheting sc evenly along this side edge.  When you get to the end, ch 1, turn, and crochet the next row.  The side might be uneven so use various stitches (sl st, sc, hdc, dc) to even out the height (i.e., in valleys use taller stitches and on hills use shorter stitches).  When you get to the end, turn, and continue adding rows until the cuff is large enough for your wrist. 

Fasten off, leaving a long tail to sew the buttons on with.  Steam/lightly block before adding buttons.


Pineapple Wrist Cuff #1

For ideas on ways to design your own unique pineapple cuffs from your favorite pineapple patterns, see this post:  Designing Pineapple Crochet Cuffs

New! Now available in a 3-pattern pack for crochet bracelets!

Click here to buy this pattern on Ravelry.
Click here to buy this pattern on Etsy.

Only want free patterns?  Here are two other bracelets which are free:  Pineapple Wrist Cuff #2 and Craft Bazaar Antique Lace.

While brainstorming new crochet cuff/bracelet ideas, I thought, why not use the classic pineapple pattern? I love crochet pineapples, but I never had a good use for them other than doilies, and, let’s face it, you can have too many doilies. 


Pattern uses size 3 thread, and requires 3 buttons (pearl suggested). Size is adjusted by adding or subtracting the basic crochet stitches at the beginning and end of each row or by extending side borders at the end. 


For troubleshooting or feedback, please contact me directly!


Note:  Don’t skip the blocking!  It’s as simple as lightly steaming the work.  It takes less than one minute, and it will fix all those wavy/wobbly issues.  I promise!


Sunday, December 2, 2012

NOLA Christmas Baskets

One great advantage of living in New Orleans and having all your relatives elsewhere is that you can make super easy and pretty cheap gift baskets with various New Orleans/Louisiana/Creole type products.  Here is a basket I made which is easily customizable with your own preferences:


"Ingredients" all from Rouses:
$2.79  Slap Ya Mama spice mix
$1.39 French Market beignet mix (small, and not shown - I used CDM beignet mix in that basket)
$1.29 Shrimp Fry
$5.99 Community Coffee
$1.39 Jambalaya rice mix
$0.79 Crab Boil
$1.29 Creole-style red beans
$0.89 Crystal hot sauce
$0.99 Zapp's chips

Basket Kit
$4.99 from World Market

Total Cost = $21.80

I wrote "Joyeux Noel" on the tag as well as the English version, and attempted to draw a fleur de lis.  I also bought a few tea towels with "Gumbo" and "Bread Pudding" written on them, but that's just extras.  :)  Note:  I don't even use most of these products, but I wanted to give my family a good cross-section of the homemade food options.  Maybe some of you can use these ideas.  :)

Thursday, December 30, 2010

Finally, I can share my crafty Christmas presents!

I was itching to share all my crochet fun in December but since a few of my "loved ones" read this blog, I couldn't risk them peaking at their presents.  I had so much fun this year because gifting gives me a chance to try out new or different patterns that I wouldn't normally try for myself but are perfect for friends and family, and I so love giving handmade gifts.  More good kharma!

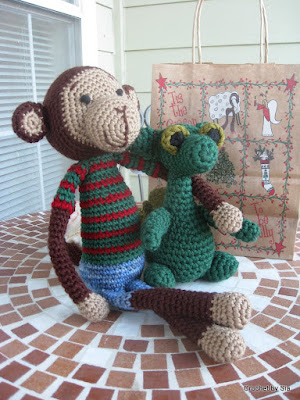
First, I had fun with a few little amigurumi guys for the new baby nephews in the family - they became besties while hanging out under the Christmas tree and were a little sad to be split apart:


Next, I made several sets of washcloths and bathmitts to pair with some great Body Shop products (thank you, Groupon!).  These were perfect since they're a quick "hook", and they were fun since I designed them as I went (you can find the first pattern here and the second here)


Since I have to pay homage to my beloved Japanese crochet and I wanted a really fun gift for my mom who is a fellow crocheter, I made a flower tape measure cozy - both my mom and grandmom got a kick out of it!


For the padre, I was really excited to try out the Aztec scarf to learn this new technique where each side has a different pattern even though you're only crocheting one layer - it really got the creative juices flowing so I'm hoping I can come up with some really unique designs in the future.


For the boyfriend's cold feet, I decided to stitch up Doris Chan's slippers - the gauge was tricky but I'm happy to report that they fit perfectly!


This crocheted Julie cuff was a great pattern find - I hope to make more in several other fun colors in the future.


And finally, the masterpiece weightless wrap for my grandmother in Tunisian crochet with an alpaca "mohair" yarn.  It took a bit of time but was worth the effort.  Now if only she would actually wear it instead of saving it for "special occasions".  :)

Sunday, December 19, 2010

Homemade Recycled Rattles

I'm making a few Christmas presents for little ones this year, and I've been struggling trying to find the best way to make them rattle.  A friend suggested to put bells inside old-fashioned pill boxes, but I found these too large to fit in my cute little amigurumi guys.  Thus, I invented my own and thought I would share with you how to make free or almost-free rattles.  Disclaimer:  the rattles aren't really machine washable so that could put a damper on your hopes (if you have ideas for making them more robust, please share!)

Here is my first cute little guy who I wanted to add noise to:


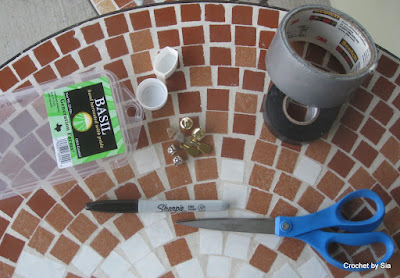
To start off, you need some materials and some supplies.
  • Container for rattle - I dug through the recycle bin and chose an inhaler mouth cap and a milk bottle spout cap.  Of course, these are open on one side so we need a means of closing them...
  • Top of rattle - I dug through the recycle bin again and found some thinner flat plastic in the form of a fresh basil container from the grocery store.  Perfectly cut-able and still noisy!
  • Noisy filling - Here's the part that can or cannot be free.  Experiment with multiple objects.  I picked up some small pebbles from outside and dug through the toolbox for small metal things (like shelf pegs or nuts).  It's, ahem, preferable not to use sharp objects which the little ones might find upon aging a few years and deciding to perform their first dissection upon said amigurumi.  I also already had some small bells.
  • Sticky stuff - I picked electrical tape, but my guess is duct tape would work pretty good too (I was afraid of gummy stuff getting everywhere though).
  • Cutting device (a.k.a., scissors)
  • Sharpie


First, use the containers as a stencil for the lid material.  Draw an outline on the flat plastic, then cut out (note that Sharpie ink may smear - like mine):


Next, experiment with noisy fillings by putting into container and placing lid on top.  Hold it together with your fingers (obvious I know, but just in case you couldn't figure that part out) and shake to see which fillings you like best.  I ended up with one small bell and one pebble in each:


Finally, assemble together with your chosen sticky stuff.  I criss-crossed the electrical tape and ran it all the way around:


One final piece of advice I have for you is to make sure you put it in your amigurumi before the hole is too small to fit it though - another piece of obvious advice but let's just say a person-not-to-be-named forgot this important detail and had to undo the last row to fit the rattle in.

Monday, December 6, 2010

Out of control crafty Christmas

I am officially out of control on the Christmas crafts this year.  This probably has something to do with my excitement to decorate combined with my lack of access to my decorations which happen to be in my storage room.  So, I set out on an epic journey to the local craft stores in search of cheap craft supplies to make Christmas decorations.  I officially scored (though admittedly some weren't so cheap), and now that the crafting marathon hubbub is starting to subside, I can share with you some of the fun things I made. 

Crochet stuff
I found a few cute patterns and decided to finally "hook" them up.  The first was a snowflake table runner which I downsized to a large doily:


Next, I worked on a poinsettia which I hoped would be a set of ornaments but was too floppy.  After finally weaving in all the ends I just put it in the middle of the doily for lack of a better place to put it, and it seems to have found a happy home:


I also found a neat Christmas tree garland pattern on Ravelry but didn't have access to the magazine.  I was too excited to wait so I just used the idea as an inspiration to invent my own version.  Here are my pre-garlanded trees:


I attempted to felt them but only made them fuzzier, then I attached them together with a chain.  I mounted the garland on the mantle where they were a bit lonely for a while until I discovered a neat knitter/crocheter wreath idea with fake yarn balls on the Jo-Ann website.  I used that idea to make yarn ball ornaments with the leftover garland yarn and some bells and voila - a more social garland:


Other stuff
Using that same yarn ball idea with an unsavory yarn that I didn't quite enjoy crocheting with, I made another ornament but this time for the real tree:


I found a fancy flower arrangement idea, but simplified to this quick, easy, cheap version:  just a glass vase with pinecones and one clump of fake poinsettias.  I added the elephant ornament photo not because I made it but because I thought it was so cute (thanks, World Market!):
 

This was another great idea from the Jo-Ann website - a cinnamon stick votive holder.  I didn't have enough sticks to cover the back of the glass, but I prefer it that way since more light can escape.  I use the LED tea lights so that I won't have anxiety attacks about potential fire hazards.


Finally, a good old grapevine wreath is quick and easy (especially when all the ingredients are on sale).  I need to re-do the ribbon since it looks a bit jacked up:


At last, a complete Christmas-y mantle with the mysterious head of Palenque watching over all (see Why I like being a slow Ironman).  He actually was quite handy when I needed something to hammer in the pins holding up the garland.
Related Posts Plugin for WordPress, Blogger...