Showing posts with label Crochet. Show all posts

Tuesday, November 18, 2014

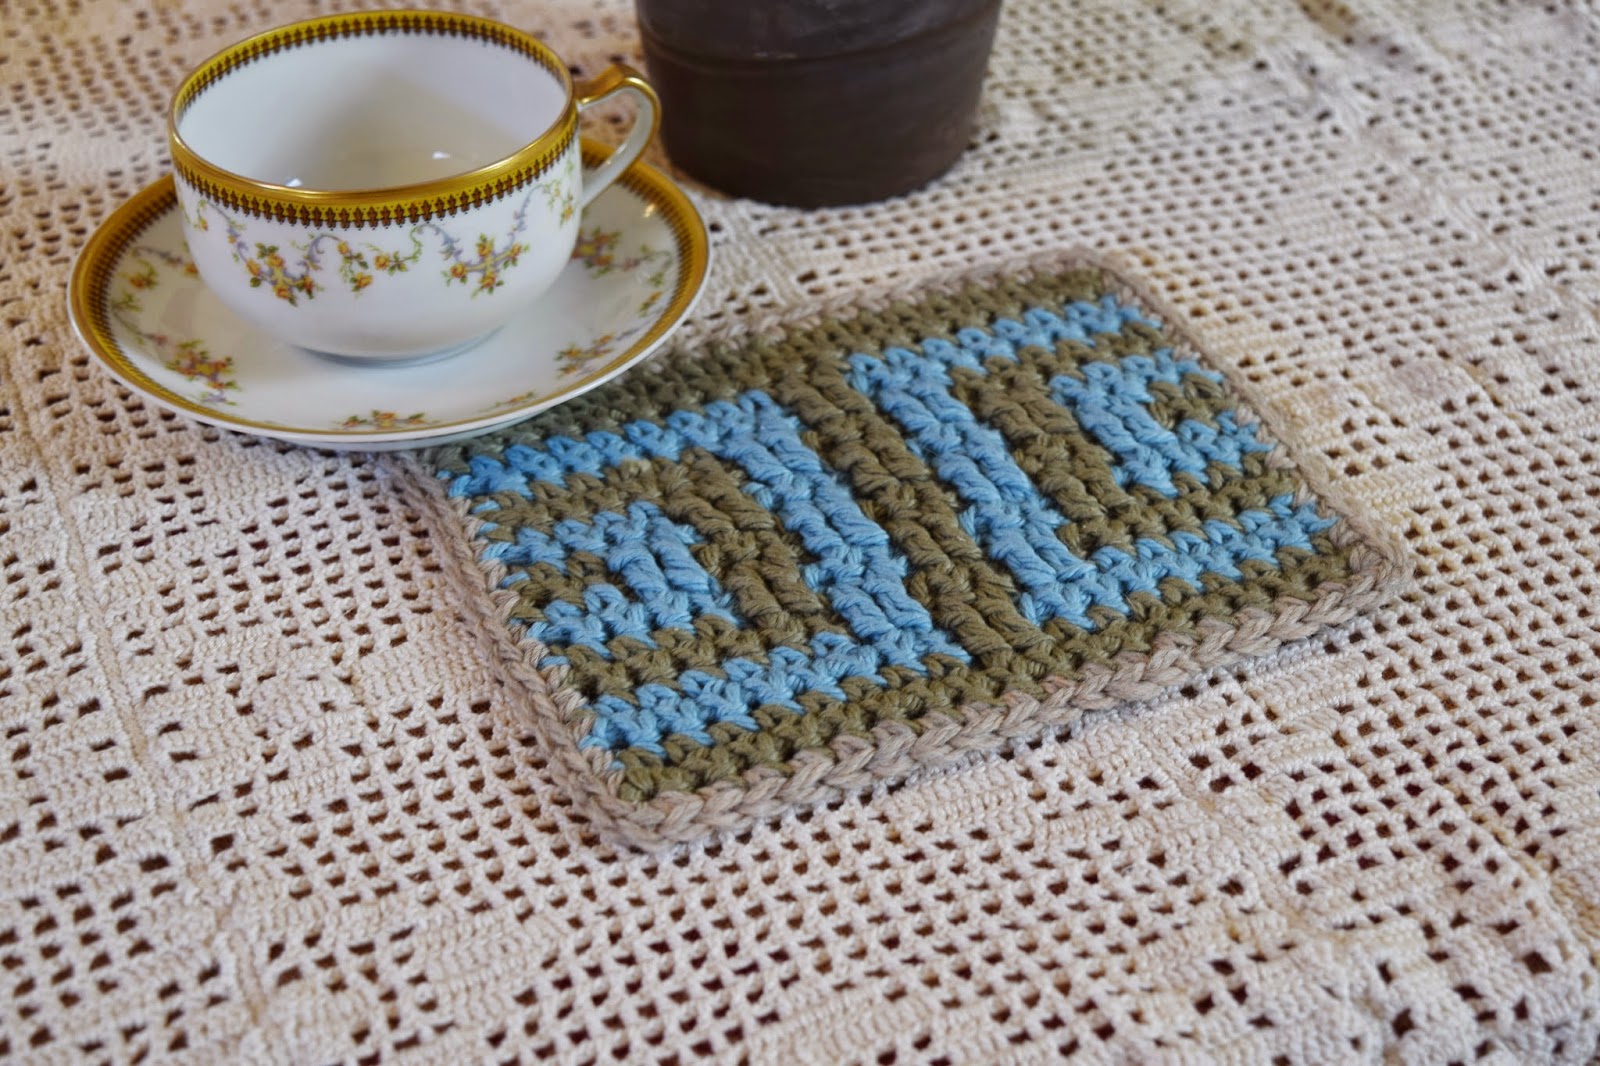
Mosaic Potholder/Washcloth Pattern

This geometric potholder (or washcloth) has concentric half-squares on one side and stripes on the other.  Make quick gifts while trying out a new crochet technique!

I designed this simple, free pattern to better show people the concepts of what I call mosaic crochet before they decide to purchase one of my patterns featuring this technique (click here to see them all).  I also include detailed videos to demonstrate the pattern techniques.  Each video is linked in its location in the pattern, but you can also see the entire playlist here.  Try out the pattern, and let me know what you think!


Gauge & Size
Gauge is not critical in this pattern unless you want to make it a specific size.  If you're using scrap yarn, I suggest using an appropriate hook size for your yarn thickness and allowing the potholder/washcloth to grow or shrink accordingly.  Gauge is 12 stitches and 15-16 rows of sc = 4 inches square.  The finished size is about 6 3/4 inches wide by about 5 1/2 inches long.

Design Notes
Color work:  When changing yarn colors, loop in the new color as the last “pull through” of the previous stitch to create better color borders.  Do not cut each color until the end.  Every other row, we drop a color behind the work and pick up the new color from the previous rows.

Blocking:  Blocking (according to your yarn type) is strongly encouraged as it makes for a much more professional-looking piece.

Even Rows:  All of the even-numbered rows are return rows for a particular color, and can be simplified to this:  ch 1 before first stitch, ch 3 across any ch-3 space, and sc in every sc or ht.  The detailed instructions are still included as a double-check.


Abbreviations and Special Stitches
The stitches in this pattern are fairly basic, except for the special half treble crochet (ht).  The ht is how we make the vertical stripes in the pattern.  We perform this stitch into stitches from previous rows.  

As you make the pattern, you will chain stitch across areas where you are in the wrong color for two rows. Then, on the next row when you are in the “right” color, you work your ht into the stitches 3 rows below the current row (always working in front of the chains).  The net effect is that the potholder will be the concentric half-squares on the front side and stripes on the back side. 
Why “half-treble”?  I’ve never heard of that stitch.  When I first started working mosaic crochet, I used dc as other patterns suggested.  I’ve found that those stitches are too short and thus cause curling.  Triple/treble crochet is a bit too high, and half-treble was just right.  Feel free to experiment with stitch height.

I created a video for how to make the Special Half-Treble Crochet (ht) stitch, which you can watch here:  https://www.youtube.com/watch?v=Q9oNoywwc1U.

Abbreviation = Stitch
ch = chain
ht = Special half-treble crochet (see video) – work in front of ch-3’s into the stitch 3 rows below.  Yo twice, insert hook in stitch, yo and pull through, yo and pull through 2 loops, yo and pull through remaining 3 loops
sc = single crochet
sl st = slip stitch
st = stitch
yo = yarn over

Motif Graphic
This graphic is provided for those of you who work better with pictures than text, like me.  Any square that is blank is simply a sc stitch. The ht stitches are worked into the sc’s 3 rows below the current row, and always worked in front of the chains of the in-between rows (watch the video).  Row 1 starts at the bottom with Color A, which is grey in this graphic.

Pattern
Beginning Chain:  Ch 19 with the I hook. 
Row 1:  Using the H hook, sc in second ch from hook and across (18 sc).  Ch 1, turn.

Row 2:  Sc across.  In last st, join Color B in last pull-through.  Drop Color A, but do not cut as we will pick it up on future rows (here and throughout pattern).   Ch 1, turn.

Row 3 (watch video):  In Color B, sc 8, ch 3 and skip 2 st, sc 8.  Ch 1, turn.

Row 4 (watch video):  Sc 8, ch 3 and skip 2 st, sc 8, changing to Color A in last pull-through (just pick it up from the lower rows, and make sure not to pull too tight).  Ch 1, turn.

Row 5 (watch video for rows 5 and 6):  In Color A, sc 6, ch 3 and skip 2 st, ht 2, ch 3 and skip 2 st, sc 6.  Ch 1, turn.

Row 6:  Sc 6, ch 3 and skip 2 st, sc 2, ch 3 and skip 2 st, sc 6, picking up Color B in last st.  Ch 1, turn.

Note:  Now that you have the hang of it, when you see “ch 3”, you will know to either skip 2 st or skip a previous ch 3.  It won’t be written fully out, which should make it simpler for you to read the pattern also.

Row 7 (watch video for rows 7 and 8):  In Color B, sc 4, ch 3, ht 2, ch 3, ht 2, ch 3, sc 4.  Ch 1, turn.

Row 8:  Sc 4, ch 3, sc 2, ch 3, sc 2, ch 3, sc 4, picking up Color A in last st.  Ch 1, turn.

Row 9 (watch video for rows 9 and 10):  In Color A, sc 2, ch 3, ht 2, ch 3, ht 2, ch 3, ht 2, ch 3, sc 2.  Ch 1, turn.

Row 10:  Sc 2, ch 3, sc 2, ch 3, sc 2, ch 3, sc 2, ch 3, sc 2, picking up Color B in last st.  Ch 1, turn.

Row 11 (watch video for rows 11 and 12):  In Color B, sc 2, ht 2, ch 3, ht 2, ch 3, ht 2, ch 3, ht 2, sc 2.  Ch 1, turn.

Row 12:  Sc 4, ch 3, sc 2, ch 3, sc 2, ch 3, sc 4, picking up Color A in last st.  Ch 1, turn.

Row 13 (watch video for rows 13 and 14):  In Color A, sc 4, ht 2, ch 3, ht 2, ch 3, ht 2, sc 4.  Ch 1, turn.

Row 14:  Sc 6, ch 3, sc 2, ch 3, sc 6, picking up Color B in last st.  Ch 1, turn.

Row 15 (watch video):  In Color B, sc 6, ht 2, ch 3, ht 2, sc 6.  Ch 1, turn.

Row 16:  Sc 8, ch 3, sc 8, picking up Color A in last st.  Fasten off Color B.  Ch 1, turn.

Row 17:  In Color A, sc 8, ht 2, sc 8.  Ch 1, turn.

Row 18:  Sc across.  Fasten off.  Weave in all ends.

If desired, add a border of sc around the entire work (watch video).  For the sides, use about one sc per row.  I ended up using 3-4 sc per 4 rows as one per every row stretched out the sides too much.  Sc 3 in each corner.

Sunday, November 9, 2014

Square Key Scarf Pattern Release!

Another pattern release!  I'm on a roll now.  :)  Check out the photos for my newest design, the square key unisex scarf.  Unique Greek key motif on one side and stripes with texture on the other.  And one super-cute canine model.

Pattern can be found on both Etsy and Ravelry.  Cheers!


Wednesday, November 5, 2014

L.Y.L.A.S. Cowls Pattern Just Released!!

Love You Like A Sister...

The photos are finally in, so you can now check out my new L.Y.L.A.S. pattern!  Grab a crochet friend for this fun project (or just make two if you don't have a best crochet friend).  :)

You can find the pattern in my Etsy shop and also on Ravelry.  Enjoy!


Thursday, October 2, 2014

It's Crochet Season!!

The heat index might be 100 degrees here in New Orleans, but I realize the rest of the northern hemisphere "might" have started cooling off by now.  I'm definitely seeing a pick up in crochet activity, so I figured it was time to get the yarn out of the attic, crank up the air conditioning, and start moving on some projects that have been hibernating during our 10-month long summer.  All for you, my fans.  You who live in cooler climates.  Hopefully a few sales will help accommodate for my higher electric bill to satisfy the masses with more patterns.  :)

So, what do you guys want this season?  Right now I'm working on a LYLAS cowl... yep, you heard right... Love You Like A Sister cowl.  It's actually two interlocking cowls that you can work on with a friend or simply make 2 and share with your non-crocheting best friend like me.

THAT should be coming soon.  But, what should come NEXT?  Give me some ideas.  I have a few, but I'd like the People to have a say.

Some ideas I'm contemplating right now:

  • Another man scarf.  You guys seem to love these.  Maybe there aren't enough in the marketplace.  The new idea is more drapey, single-color, and light to show off a textured pattern.
  • Fleur de lis beanie hat using cables.  I have yet to invent how this would actually work, but whatever will help my Saints, I will do...
  • Poop bag holder for my fellow dog-owners.  I need some fun ideas for this though.  No serious poop bag holders here.
  • Pillow cover with a textured scene, and eventually a complimentary set of squares that could be made into an afghan.
Which ones do you love/hate?  Any special requests?  Special requests that get made will get a free copy of that pattern or any other in my etsy shop.  :)

Monday, June 9, 2014

Phone Cozy

I had some leftover awesome-looking sari yarn and thought my phone looked cold even though I live in New Orleans. Alas, my creativity led me to do something about both problems at once.


Yarn:  I used Berocco Idol which is a variegated sari yarn.  It is theoretically bulky, but I found that it worked up more like an aran weight or heavy worsted weight yarn.  You can adjust the pattern to match your yarn weight (add/remove beginning chains and add/remove rows).

Materials:  Crochet hook size US H (5.0 mm) or appropriate size for your yarn, yarn needle (to weave in ends)

Abbreviations and Special Stitches 
ch = Chain 
dc = Double crochet
hdc = Half double crochet
sc = Single crochet
sc2tog = Single crochet 2 together
sl st = Slip stitch
st = Stitch 

Note:  Throughout pattern, the chains at the beginning of a row do not count as the first stitch.

Main Body (worked in the round)
Beginning chain:  Ch 10.
Row 1:  Sc 2nd ch from hook and across (in back loops).  Sc 3 more times in last ch.  Rotate to work back across in the front loops to the beg ch.  Sc 2 more times in the beg ch. (Net stitches:  4 total sc in the beginning and ending ch, and 2 sc on either side of each of the other ch for 24 total sc). Sl st to top of beginning sc.
Row 2:  Ch 1, sc in same st and around, sl st to top of beg sc (24 sc).
*** After row 2, test the size of your cozy by inserting your phone.  If it is too big, start over with a smaller beg ch.  If it is too small, start over with a larger beg ch.***

Row 3:  Repeat row 2.
Row 4:  Ch 2, hdc in same st and around, sl st to top of beg hdc (24 hdc).
Row 5:  Repeat row 2.
Row 6:  Ch 3, dc in same st and around, sl st to top of beg dc (24 dc).
Rows 7-14:  Repeat rows 3-6 two times.
Row 15:  Repeat row 2.  Do not fasten off - continue with Flap row 1...

Flap (worked flat)
Flap row 1:  Ch 1, sc in same st and next 9 st (10 sc).  Ch 2, turn.
Flap row 2:  Hdc across (10 hdc).  Ch 1, turn.
Flap rows 3-6:  Repeat rows 1-2 two times.
Flap row 7:  Sc across first 8 st then sc2tog in last 2 st (9 st).  Ch 1, turn.
Flap row 8:  Sc across first 7 st then sc2tog in last 2 st (8 st).  Ch 1, turn.
Flap row 9:  Sc across first 6 st then sc2tog in last 2 st (7 st).  Ch 1, turn.
Flap row 10:  Sc across first 5 st then sc2tog in last 2 st (6 st).  Ch 1, turn.
Flap row 11:  Sc across first 4 st then sc2tog in last 2 st (5 st).  Ch 1, turn.
Flap row 12:  Sc across first 3 st then sc2tog in last 2 st (4 st).  Ch 1, turn.
Flap row 13:  Sc across first 2 st then sc2tog in last 2 st (3 st).  Ch 1, turn.
Flap row 14:  Sc in first st then sc2tog (2 st).  Ch 1, turn.
Flap row 15:  Sc2tog.  Do not fasten off.  Make the wrap cord by chaining for about 1 yard.  Fasten off.  Keep end tail to tie off pom-pom.

Pom-Pom (See photos below)

  1. You may want to practice with junk yarn first.  Cut a piece of yarn at least 6 inches long and set aside.  
  2. Find an object whose circumference is a bit more than half of what you want the diameter of your pom-pom to be.  Wrap yarn around it many times (20+) and then cut the end. 
  3. Carefully slip all the yarn off the object and use the previously cut yarn length to tie tightly across the middle of the loops.  Knot one side then loop back and knot the other side too for insurance.  
  4. Now snip all the loops.  You will have a scraggly looking pom-pom like the one below:
  5. Trim all the ends EXCEPT the ends of your knot yarn until you have a nice, even pom-pom.  
  6. Tie the knot yarn to the tail of your wrap cord then weave in/trim all ends.


Sunday, January 26, 2014

New pattern release: Andras Man Scarf

I just released the Andras man scarf pattern on both Etsy and Ravelry.  Here are the photos - and yes, that is my dad.  I wanted to make him a special Christmas present that was stylish and represented our culture.  I hope you enjoy it too!


Wednesday, January 1, 2014

2014: The year of Health and Discovery

This might be overkill, but I'm declaring some pretty big goals this year.  Actually, the goals are more like the results of what I am hoping to establish as systems or routines for being a happier person.  I don't want to say that my goal is to become a better person because that implies that I am not a good one.  As a society, we are starting to drift further and further away from the things that make us happy humans, so my goals, or systems, are focused on getting back to what matters.

Why systems and not just the goals?  Because my friend Courtney recently shared an article that made some sense to me which essentially says we might be more successful if we establish systems rather than goals - you can find the article here.

Data.  So, I'm a data geek, and I love numbers and spreadsheets.  I also want a nifty way to show people how I'm doing in achieving my goals (really systems but I have to make them into goals for everyone else to understand and track, and I'm not too intimidated by big goals after having done Ironman twice).  So, at the risk of exposing myself as too much of a data nerd, here is a Google spreadsheet that the whole world can view, and maybe even off-world beings if they have access to our interwebs, where you can track my progress on the big goals.  I even opened it up for commenting, so have at it!

And now, what you've been waiting for... here are my big goals (really systems):

HEALTH

  • Complete 1,000 miles of fitness.  This can include running, walking, swimming, and maybe some biking though I will avoid using biking/cycling too much because then the goal would be too easy to game.  My friend Rob just completed his 1,000 miles of running goal for 2013.  I liked that idea, but I wanted to be inclusive of other sports.  Again, my goal is more to establish a regular system of fitness where I am eager to achieve a daily/weekly goal of miles.  This will be new to me because usually I use a specific race as an end goal for fitness.  Now, I want to try to achieve fitness just for fitness' sake.
  • Don't eat processed junk food.  So, I'm not really going to track this one, but I generally want to get into the habit of not reaching for sweet or salty junk food that is processed.  I really don't even like it that much, so why do I continue reaching for it?  Because the food industry has made it addictive.  If you read closely, you know there is a big loophole here, but I think it's a good one - I can still eat homemade junk food.  This is great because I love baking, so I can still try my creations and be polite by eating other people's creations, and not deprive myself so much that I end up binging anytime the will power slips for a second (aka, I have a glass of wine).
  • Limit virtual connection time to make more time for real conversation and partaking of actual life.  I've become more and more concerned about the impact of us being ultra-connected.  It looks like a few other folks are starting to recognize this and put it into better words.  This is an excellent video about how we are more connected yet more alone - yes, it's almost 20 minutes long, but I was pretty much glued to the screen after about 6 minutes (a bit of a slow lead up, but well worth it).  So, how am I going to work toward this?  I already downgraded my phone to an old-fashioned flip phone with no data.  Strange, but true.  I actually feel more free when I'm out of the house with no internet access.  I still have my wireless iPad mini as a crutch, but I usually don't carry it.  What else?  Only check social media 3 times per day.  When possible (depending on work issues), only check email 3 times per day.  Start my day listing what I need to achieve before coming anywhere close to the interwebs and email.  I had a bit of debate with myself about whether to put this goal in HEALTH or DISCOVERY.  I ended up with HEALTH because I think it will help so much with mental and social happiness that the DISCOVERY benefits will just feel like gravy.

DISCOVERY

  • Write for 1 solid hour per week.  You are witnessing the result of most of the first hour of this goal.  How does it feel to be a part of the madness?  Anyway, I've always wanted to experiment more with writing, and I've read several articles/blogs that mention a key part of being a writer is just getting the words out - and, a simple, achievable way to do that is to simply require yourself to write every day.  I'm not trying to quit my day job, so I'm going to start out with just one solid hour per week, and see how that makes me feel through the year.  The writing does not have to be toward any particular purpose (like blogging), but can be anything - stream of conscious, stories, work-related, etc.  As long as I am close to constant-writing during that block of time.
  • Release at least 1 crochet pattern per month on Ravelry and Etsy.  For a couple of years now, I've been selling patterns though not very seriously.  As I released a few more and opened my Etsy shop, I realized that this hobby could actually contribute more to my income which is great because I actually love all the aspects of this small business (like social media marketing, etc.).  The primary limit of this area of potential is simply the number of patterns that I have available.  So, by releasing at least one pattern per month, I can gradually grow this business while keeping it enjoyable.  Oh, and writing patterns does not count as writing time - it's much more mathematical and spacial conception applied to paper, not creative writing.
So there you have it.  My big, fat Greek-American goals for the year 2014.  Let me know what you think.  Cheers and Happy New year!

Monday, December 2, 2013

Hellas Cowl Pattern Release

I'm super excited about the release for this pattern - the thicker yarn and cowl design make it quicker and easier than the Hellas Scarf.  You can find it on both Ravelry and Etsy.  Also, I made a video tutorial for the one special stitch which can be found here.


Thursday, November 21, 2013

The Fifth and Sixth Hats of Christmas

(click here for the intro post on my Twelve Hats of Christmas)

For the Fifth Hat of Christmas I truly crocheted for me... more than 5 colorful rings...
I finally found a good use for my Noro Silk Garden - it's been sitting in my stash for over 3 years!  

Ravelry project notes:  I modified the beginning chain to only 78 stitches. I also modified the last few rows (top of hat) to make it more oblong rather than circular (crocheted together in front and back area more than sides).

For the Sixth Hat of Christmas I truly crocheted for me... one hat a laying...
I say "a laying" because this hat is a bit floppy so it takes some work to get the bill to sit properly.  I tried felting a bit, but got tired before it did much.  

Ravelry project notes:  This is a really cute pattern. The smaller stitches made it take a bit longer, but it’s an easy pattern - basically just a bunch of double crochet and some single crochet.
This yarn is theoretically DK, but actually probably a bit thinner. It lays and drapes well, which I’m not sure is good for a hat pattern, but I like how it’s low-profile.
I added one more row of double crochet, but I don’t think it was necessary in hindsight.
I needed to block this a lot as it curls - I think more for the yarn and looser stitch. I need to re-block the brim a bit.
FYI, yarn amounts are only approximate. My battery died on my scale. I used 2 strands for the flower.
My Hat Queue Status
* subject to change based on my whim

  1. Women's Peaked Cap - done!
  2. Felted Fedora from The Color Book of Felted Crochet - done!
  3. Crochet Owl Hat for a toddler... or maybe an adult like me because it's so cute - adult done!
  4. Puppy Hat for 6-9 month old - done!
  5. Cap with flower (pdf) - done!
  6. Slanting Stitches hat (photo is bad, but it looks cute when you roll up the brim) - done!
  7. Audrey's Lace Cap
  8. Lacey Newsboy Cap (I have no idea the real name - this is a Japanese pattern from this book)
  9. Puff Stitch Newsboy (ditto on the name - from this other Japanese crochet book)
  10. Relax Ramie Hat (pdf)
  11. Tsubaki Cotton Hat (pdf)
  12. Girly-style hat (pdf)

Maybes
Please post links to any crocheted hats you think I should make in the comments!

Wednesday, November 20, 2013

Vieux Carré Towel

New pattern released on Etsy and Ravelry!

The Vieux Carré, or Old Square, is the original French name of the French Quarter in New Orleans. This towel was inspired by intricate old world details and luxury. The outer edging mimics picot stitches and fleur de lis. Set out a few of these in your guest bathroom when entertaining, or use pair it with bath products in a sumptuous gift basket.

This crochet pattern is written for the fingertip towel size, and instructions are included for how to modify for hand or bath towel size. Includes 3 photo tutorials for special stitches. Appropriate for a beginner who is confident in basic stitches and wants to try some new stitch motifs.


**NEW** You can now get patterns for this towel, the Spa washcloth and bath mitt, AND the Luxe washcloth and bath mitt in one discounted pattern pack.  Check it out here.


Wednesday, November 13, 2013

Team Colors Earflap Hat Pattern Release & Embroidery Tips

Represent your school!!  I just released the Team Colors Earflap hat on Etsy and Ravelry.

It uses half-double crochet and single crochet for an easy work-up.  Note that this pattern is for the base hat, NOT for the embroidery representing any particular team.  So, this blog post describes how I added my team embroidery so that you can get ideas on how you can customize your hat.


First, I found an image that I wanted to use and printed it out.  I reduced the size by making a copy and reducing it by using the copier setting (old school style).  Next, I used a thin, translucent paper to trace the image.  Actually, I used parchment paper, like the kind for cooking since I don't have fancy tracing paper or that special temporary fabric used for embroidery.

Let me take a time out to note that embroidering on crochet is an imperfect art.  The spaces between stitches can distort stitches.  I found that making a good image worked better by only embroidering the outline rather than filling it in.  For the embroidery masters out there, please chime in with tips.  My guess is sewing some fabric to the back of the forehead flap may make an improved embroidery "canvas".

Back to the instructions...  I cut out my traced image (keeping some border space) and placed it on top of the forehead flap where I wanted the final image to go and temporarily pinned it there.  Next, I used back stitch to embroider the outline of my design.

Finally, I carefully removed the tracing (parchment in my case) paper in small bits to ensure that I didn't distort any of the stitches.  I tested filling in the outline at this point but was not successful in producing something that I liked, so I kept it as an outline.  

I'd love to see your own results or hear your tips!

Thursday, November 7, 2013

The Third and Fourth Hats of Christmas

For the Third Hat of Christmas I truly crocheted for me... a hat for the play pen...

This was actually my second hat from this designer - I learned that I needed to tighten my gauge a bit when I accidentally made an owl hat that fit myself instead of my friend's toddler.  As they say, we learn from our mistakes.  Here is the Puppy Hat with some bonus photos of the Puppy Hat on a Puppy.


Ravelry Project Notes:  I had to go down one hook size to get approximate gauge. I also consciously tightened up a bit. I made an extra round on the nose, and also stuffed it with yarn scraps before sewing it on. Cute hat.

For the Fourth Hat of Christmas I truly crocheted for me... one big bird...

Alas, the aforementioned giant owl hat theoretically for a toddler.  I may have found my new Mardi Gras hat.  :)  Oopsie...


Ravelry Project Notes:  So, my gauge was off, but I was too lazy to pay attention until it was too late. Poor me. Stuck with a really cute owl hat that was supposed to be for a child that now happens to fit me. :)
I fixed my gauge in the same designer’s puppy pattern by going down to a G hook and purposely crocheting with a bit more tension. I love her designs.
My Hat Queue Status
* subject to change based on my whim

  1. Women's Peaked Cap - done!
  2. Felted Fedora from The Color Book of Felted Crochet - done!
  3. Crochet Owl Hat for a toddler... or maybe an adult like me because it's so cute - adult done!
  4. Puppy Hat for 6-9 month old - done!
  5. Cap with flower (pdf)
  6. Audrey's Lace Cap
  7. Lacey Newsboy Cap (I have no idea the real name - this is a Japanese pattern from this book)
  8. Puff Stitch Newsboy (ditto on the name - from this other Japanese crochet book)
  9. Slanting Stitches hat (photo is bad, but it looks cute when you roll up the brim)
  10. Relax Ramie Hat (pdf)
  11. Tsubaki Cotton Hat (pdf)
  12. Girly-style hat (pdf)

Maybes
Please post links to any crocheted hats you think I should make in the comments!

Friday, November 1, 2013

The First and Second Hats of Christmas

For the First Hat of Christmas I truly crocheted for me... a quick and easy project under an oak tree...

The results are in, and I'm 1 for 2.  The peaked hat came out cute, and it was quick and easy:


Ravelry Project notes:  Cute and quick hat. I had no problem with sizing. My natural tension fit the size of my head. I did have to redo the brim though. I assumed I would need to tighten up a bit, but that was clearly the wrong assumption as it made the brim curl and stick to my forehead rather than stick out like a real brim. Instead, I loosened up a bit more than natural and it came out fine. Love it!

For the Second Hat of Christmas I truly crocheted for me... a felted fedora that I really do not love...

Yeah, so this originally came out more like a top hat until I manipulated it into a salvageable cowboy hat.  I was a little freaked out before the felting, but it shrank up fine after about an hour of agitation... talk about a workout!  I don't like the hat so much, but it was fun exploring felting, and I'm sure this won't be my last felting project.


Ravelry Project Notes:  So, this was supposed to be a felted fedora. It originally came out more like a top hat, but I was able to manipulate the crown a bit to make it shorter and look more like a cowboy hat. It’s all different colors because I kept running out of yarn. So, it wasn’t the greatest project, but I do like how felting comes out so I might try felting out a bit more. The higher difficulty is only because of the work involved in agitating for a hard felt.

My Hat Queue Status
* subject to change based on my whim
  1. Women's Peaked Cap - done!
  2. Felted Fedora from The Color Book of Felted Crochet - done!
  3. Crochet Owl Hat for a toddler... or maybe an adult like me because it's so cute
  4. Cap with flower (pdf)
  5. Audrey's Lace Cap
  6. Lacey Newsboy Cap (I have no idea the real name - this is a Japanese pattern from this book)
  7. Puff Stitch Newsboy (ditto on the name - from this other Japanese crochet book)
  8. Slanting Stitches hat (photo is bad, but it looks cute when you roll up the brim)
  9. Relax Ramie Hat (pdf)
  10. Tsubaki Cotton Hat (pdf)
  11. Girly-style hat (pdf)
  12. TBD

Maybes
Please post links to any crocheted hats you think I should make in the comments!

Related Posts Plugin for WordPress, Blogger...